How can I use DISA’s Enterprise Collaboration Management?
Enterprise Collaboration Management
DISA’s Content Management is the DoD’s file sharing solution. Using the features found in ECMCS you can upload files, control who may access them, determine an update and reporting chain by using workflows, and restrict file updates to a particular series of Revision numbers. The following information will instruct you on how to use Content Management to hold your documents and manage their update flows.
Lists on Sharepoint are just a gathering of documents grouped and presented together. When you create a list you are designating associations between documents on Sharepoint that are intended to be viewed and managed as a group. Lists will typically have an intent; the reason that these documents are being grouped together that will serve as a focus for the list.
Creating a List
- Navigate to the Enterprise Collaboration Site you wish to create a list for.
- Open the ‘Site Actions’ menu in the upper left
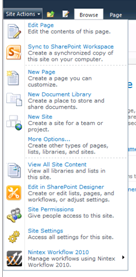
- Select ‘More Options’
- On the left you may select ‘List’ to filter only List templates
- Select the Template desired
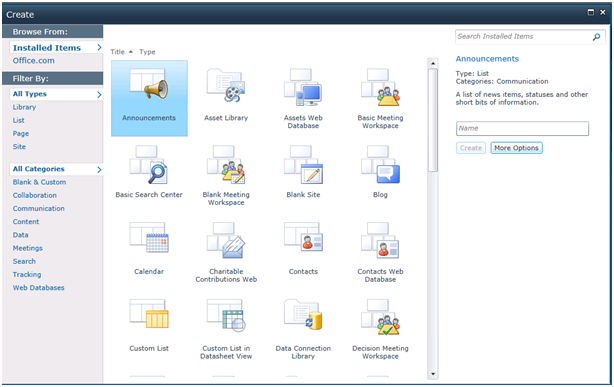
- Enter a name for the List on the right
- Click the Create button
- On the next window you will be able to enter a description for the List
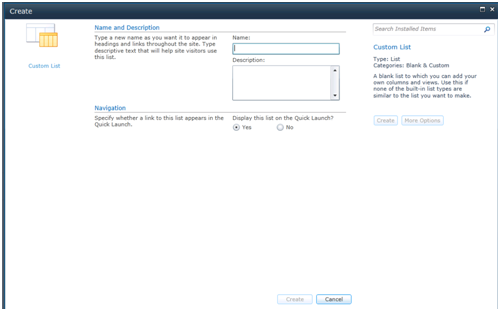
- Finally you can make the list display on the Quick Launch for the site by selecting the appropriate option.
- Click the Create button
Creating a Document Library
A Document Library is the file repository on Sharepoint. This is a special kind of list where documents are stored and shared. Other lists will not be able to contain documents.
- Browse to the site you wish to create a Document Library in
- Open the Site Actions menu
- Select New Document Library
- On the following screen you can configure the following:
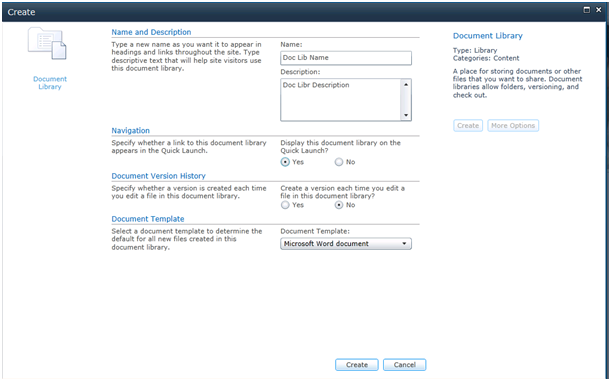
Name and Description
The name and description of the Document Library
Display on Quick Launch
Controls whether this Library appears on the Quick Launch list
Version History
Forces a new version of a file to be created each time a file is edited
Document Template
Which type of document will a user create when they click ‘New’? - Click the create button to finish creating the list.
Workflows
A workflow is a sequence of operations. You can employ workflows on Sharepoint to mandate a specific update path for anything on ECMCS. It locks down the editing of objects from sources outside the user who is responsible for completing the current step as designed. Workflows allow you to develop a reporting and update chain for objects located in the ECMCS system.
Assign a Workflow to a List Item
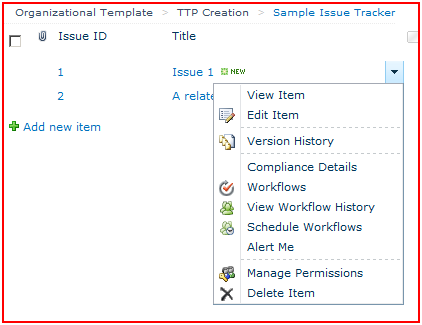
- To assign a workflow to an item in a list, first go to that list and locate the item in it.
- When you hover your cursor over the item in question a drop-down box will appear.
- Open the drop-down box and select Workflows

- This will open the workflow page for this list item.
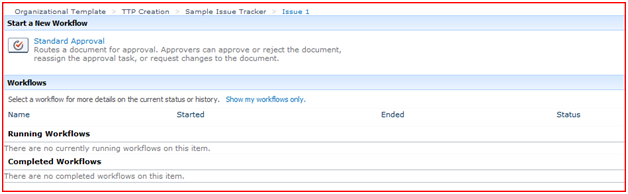
- Select your workflow type desired.

- “Standard Approval” is the default Workflow
- Some workflows have configuration options you will need to select.
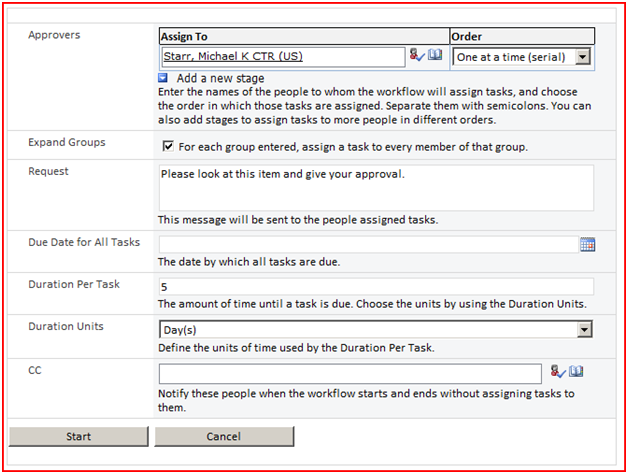
- Click the ‘Start’ button on the configuration page
- Now the user will see the assigned workflow and if it is in currently in progress.

Nintex Workflow
A Nintex Workflow is a commercial workflow product that allows you to design your workflow visually like a flow chart and integrate it into your processes in the Enterprise Collaboration Services product.
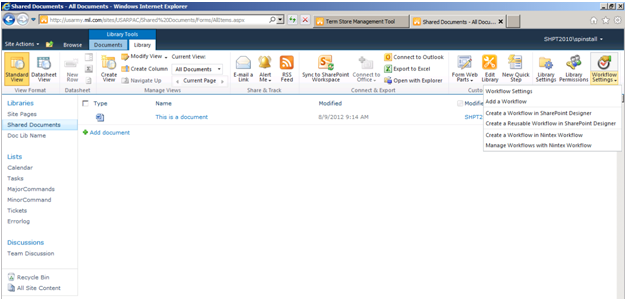
- To assign a Nintex workflow to an item first browse to the library or list where you can locate that item.
- Open the Workflow Settings menu in the upper right and select “Create a workflow in Nintex Workflow”
- Select a Workflow Template from the list of templates
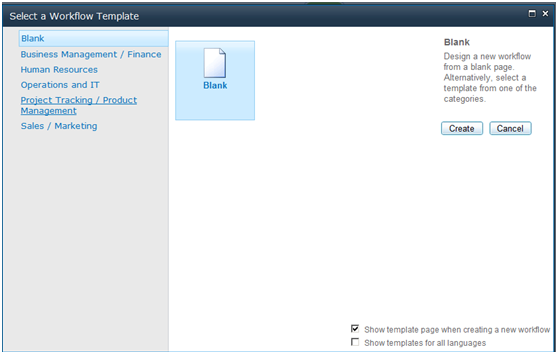
- “Blank” is the default Nintex Workflow template
- On this blank Nintex Workflow you can add shapes by dragging them from the left side and edit paths and object’s configuration options
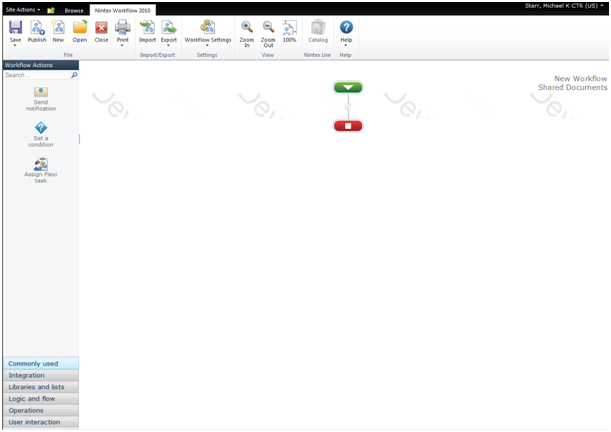
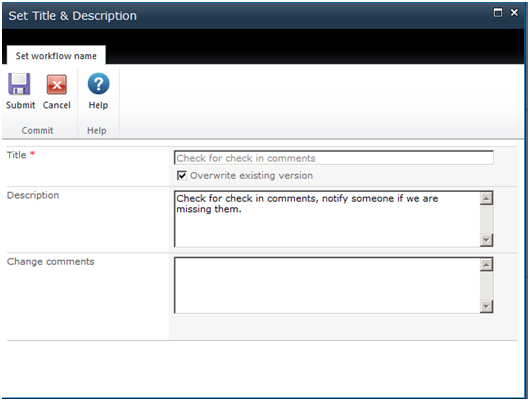
- When you are finished click ‘Save’ on the ribbon to save your workflow

- The save/publish screen here will allow you set your Title and Description for your workflow as well as add comments.
- There are additional options for your Nintex Workflow that can be assigned and accessed after creation.
- To access these options return to the list or library view from the first step, open the Workflow Settings menu and select the Workflow Settings option.
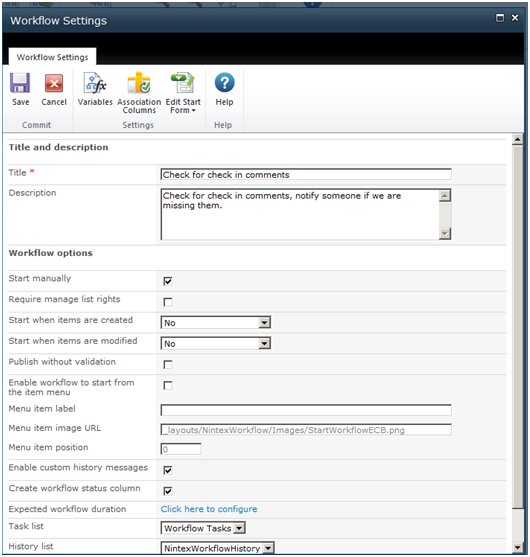
Options:
- Title
Change the title for this workflow - Description
Change the description for this workflow - Start manually
Allow for a manual start to this workflow - Require manage list rights
Requires a user to have rights to manage a list before manually starting a workflow in this list - Start when items are created
Set this to automatically start a workflow when items are created - Start when items are modified
Set this to automatically start a workflow when items are modified - Publish without validation
Allows this workflow to publish items without validation - Enable workflow to start from item menu
Place an option to “enable workflow” on the item menu - Menu Item Label
Label text when placed on the item menu - Menu Item Image URL
Label image URL when placed on the item menu - Menu Item Position
Position of the item within the item menu. - Enable Custom History Messages
Turn this option on for custom history messages - Create workflow status column
Enable this to have a workflow show its status in the list - Expected workflow duration
Set the expected duration of the workflow - Task List
Select which task list is used to track tasks for this workflow - History List
Select which list is used for tracking the workflow history
Canceling a Workflow
A workflow may need to be stopped prematurely. It may be that an administrator simply wants to break the workflow in progress or it may be that the workflow stops responding and has an error. Canceling or Terminating the workflow allows you to do this.
Canceling the workflow:
- Canceling a workflow will stop the workflow on the current step, all uncompleted workflow tasks become marked as canceled, and all workflow participants are notified via Enterprise email that the workflow was canceled.
- Open the List or Library where the workflow item is located

- Move your mouse pointer over the item whose workflow you wish to cancel
- Open the drop-down box that appears and select Workflows*
- On the workflow page that appears click the name of the workflow you wish to cancel
- Under ‘Workflow Information’ click ‘Cancel this workflow’
- *-You may also be able to click the ‘In Progress’ link on the item in the list to take you directly to the workflow page.

Terminating the workflow:
Terminating a workflow will stop the workflow on its current step, all tasks (completed and uncompleted) will be canceled, and all tasks created by the workflow are deleted.
- You must have the Manage Lists permission level in order to terminate a workflow.
- Open the List or Library where the workflow item is located

- Move your mouse pointer over the item whose workflow you wish to terminate
- Open the drop-down box that appears and select Workflows*

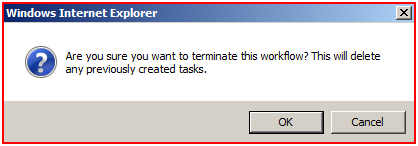
- On the workflow page that appears click ‘Terminate this workflow now’
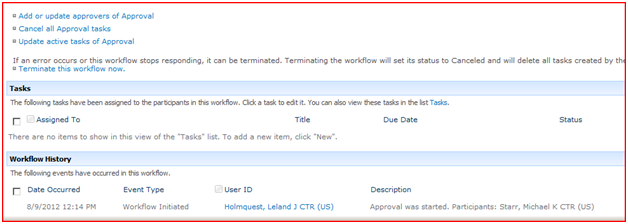
- Click ‘Ok’ to confirm
- *-You may also be able to click the ‘In Progress’ link on the item in the list to take you directly to the workflow page.
Revision Control
Revision control is a process by which changes can be ordered, structured, monitored, labeled, and incrementally saved. When a document has Revision control enabled on it a limited amount of people are allowed to edit the file (configurable) and the system will force them to update the Revision number each time they upload a change to the document. This allows for a measure of safety and redundancy to the update process when these updates must be tracked and the history kept on it.
Versioning
Versioning is the process of revision control once it has been enabled on a document. When a document is updated it is forced to have a new version number which is why this process is called versioning. Please note that in ECMCS versioning is turned on or off for and managed at the library level so if you need different versioning rules for documents you may need more than one library.
- To turn versioning on first browse to the library where you wish to enable revision control
- On the Library Ribbon click the Library Settings button toward the right
- Under General Settings select Versioning Settings
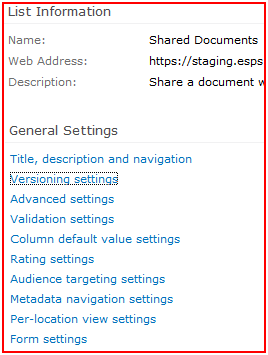
- You are brought to the Versioning Settings page with the following options:
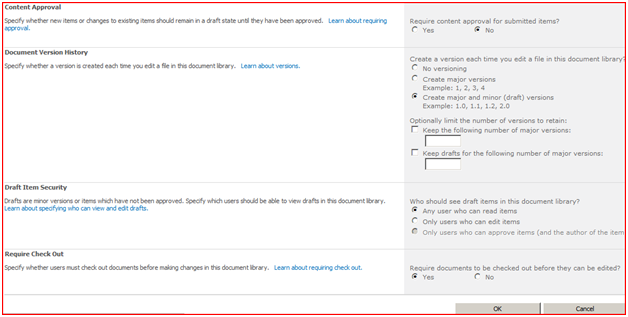
Content Approval
This option forces every update to content within the library to require approval before being made available.
- Document Version History
This option is where you set the actual version designation options. You may elect no versioning, only major versions, and major and minor versions.In addition you can set a limit on the maximum number of versions to keep. By default all versions are saved but checking either of the boxes and entering a number will designate a maximum number of versions to be saved. - Draft Item Security
Until a document version is updated it may be saved as a draft. You can control which users can see these drafts using the Draft Item Security options. - Require Check Out
This forces documents to be Checked Out before they can be edited. For more information on Checking a document Out please see below.
Check In/Check Out
When you have a team of users who are capable and responsible for updating documents in your Enterprise Collaboration Library you want to avoid situations where two people are making edits at the same time. This is what the Check Out feature is for. When you Check a document Out you are designating that document as in use; this will allow you to make edits to the file but will prevent anyone else from doing so until you have uploaded your changes, also known as Check In.
Check Out
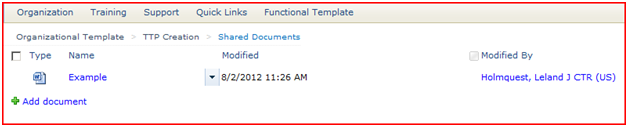
- In order to Check a file Out first browse to the Library where that document is listed
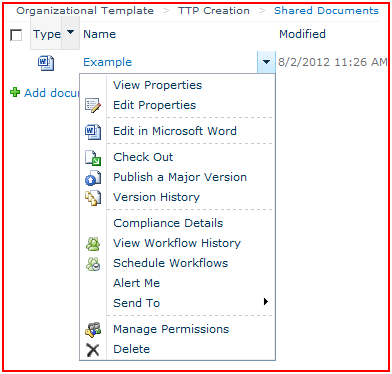
- Hover your mouse pointer over the file you wish to Check Out
- Open the drop-down menu that appears
- Select the Check Out option
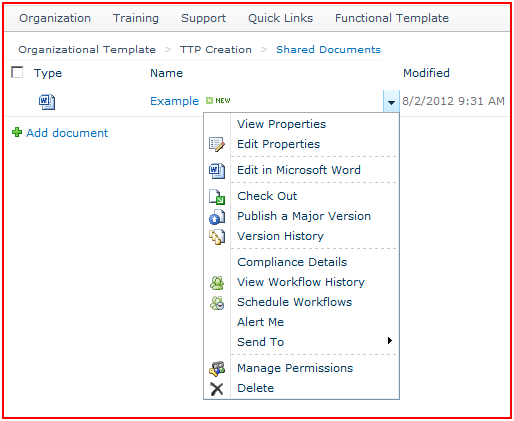
- You will see the list item’s icon change to include a green arrow indicating that the item is checked out
Check In
- In order to Check a file In first browse to that Library where the Checked Out document is listed
- Hover your mouse pointer over the file you wish to Check In
- Open the drop-down menu that appears
- Select the Check In menu option
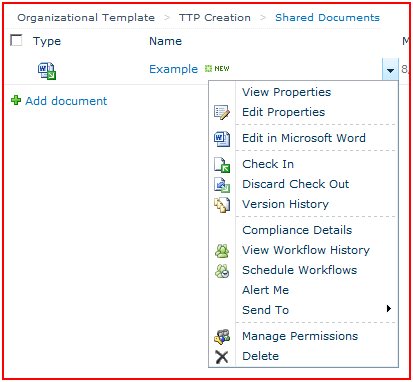
- Select your Check In options
- The “Checked Out” icon is removed from the item to indicate that it is no longer being checked out.
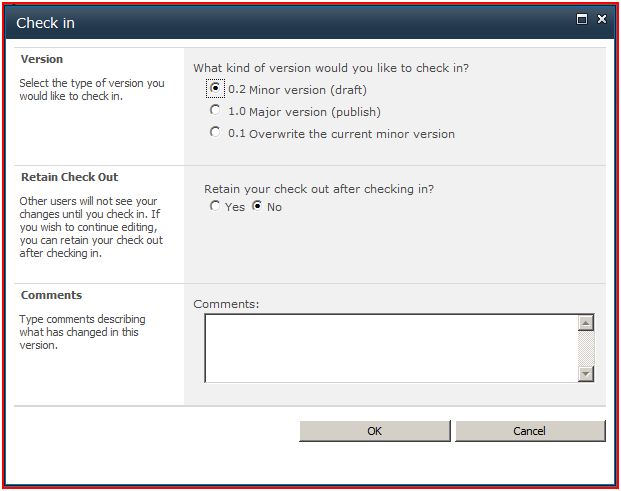
- Version
This allows you to publish a draft version (incrementing the version number by .2), a major published version (incrementing the version number to the next whole), or to overwrite the current minor version for a .1 version number update. - Retain Check Out
This allows you to keep the file in a Checked Out state after updating. - Comments
This box allows you to enter a description related to the version update.
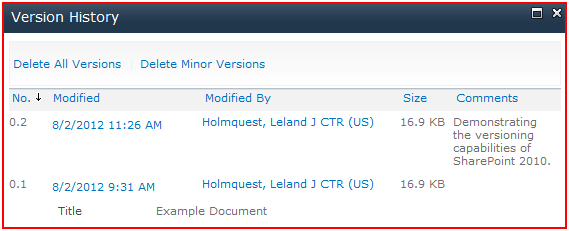
View Version History
With revision control you have the capability to view any of the past saved versions of a document. When a document is updated any previous version is retained and able to be accessed by anyone with access to the file. You can view the version history either directly through the Sharepoint interface or in Microsoft Office when the file has been downloaded.
Sharepoint
- *Note that in order to view the history for a document version control must be enabled for a library.
- Open the library where the document is located
- Hover your mouse pointer over the file whose history you want to review
- Open the drop-down menu that appears
- Select Version History
- A new window will appear listing the history of the document
- Select the document you want to view the history for
Office
- *Note that in order to view the history for a document externally it must be an MS Office document.
- Download the file and open it in the appropriate Office program
- Open the Office menu
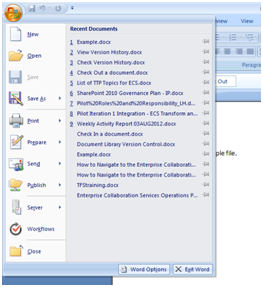
- Select the Server sub-menu
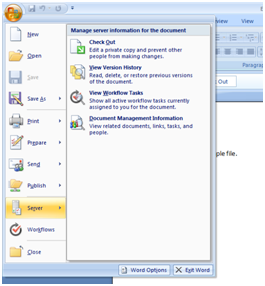
- Select View Version History
- A window will open showing the version history
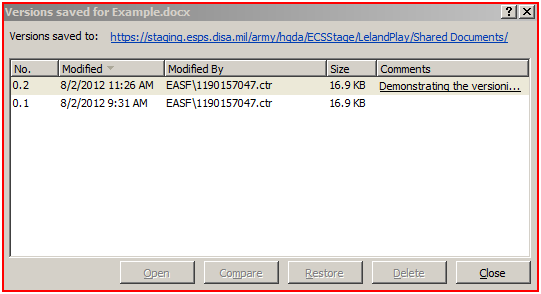
- Select the document you want to view

Correction 3, 4, 5, 6 and 8 don’t work. 2 is just fine.
This has been updated. Thanks.